Migrating a WordPress site to a new hosting provider may sound intimidating, but with the right approach, it’s a structured and manageable process. Whether you run a small blog or a large business website, your choice of hosting directly impacts speed, security, and overall performance. If your current host no longer meets your needs, moving to a more reliable environment with professional IT server and hosting management ensures your site can grow without unnecessary technical roadblocks.
Why Businesses and Bloggers Need Hosting Flexibility
- Scalability: As traffic grows, you may outgrow shared or basic hosting plans and need more resources.
- Performance: A faster server reduces load times, improving user experience and search engine rankings.
- Security: Advanced hosting often includes stronger protection against malware, hacks, and data breaches.
- Support: Reliable hosts provide better customer service, which is essential when running into issues.
Common Challenges During Migration
Switching hosts isn’t just about moving files. Website owners often face:
- Downtime: Improper transfer can cause temporary site unavailability.
- Data Loss: Without a verified backup, valuable content and customer data may disappear.
- SEO Risks: Incorrect redirects or broken links can impact rankings and user trust.
- Configuration Errors: Database connection problems or plugin conflicts can make the site unstable.
What This Guide Will Cover
The goal of this step-by-step guide is to remove the guesswork. You’ll learn:
- How to prepare your WordPress site for migration.
- Multiple transfer methods — from manual to plugin-based.
- Best practices to protect SEO, minimize downtime, and avoid errors.
By the end, you’ll have a clear roadmap for moving your site safely, whether you’re a beginner looking for an easy solution or a developer needing full control.
When Should You Consider Moving Your WordPress Site?
Deciding to move a WordPress site isn’t something you do on impulse. It usually comes after noticing recurring issues with your current host or recognizing new requirements your site has outgrown. Understanding the right time to migrate can save you from lost visitors, damaged SEO, and unnecessary technical headaches.
Signs of Poor Hosting Performance
- Slow Loading Speeds: Even with caching and image optimization, if your site still takes several seconds to load, your server may be the bottleneck. Search engines penalize slow websites, and visitors rarely wait.
- Frequent Downtime: If your site often goes offline, it signals server instability. Downtime erodes trust, frustrates users, and leads to lost revenue.
Outgrowing Current Hosting Resources
As your website attracts more visitors or you add heavier functionality (like eCommerce or membership portals), you may hit your hosting limits:
- Bandwidth restrictions can cause your site to crash under high traffic.
- Limited storage makes it difficult to upload media or scale content.
- Resource caps (CPU, RAM) prevent smooth handling of plugins, databases, and large files.
Security Issues and Outdated Environments
If your host runs outdated versions of PHP, MySQL, or lacks proactive security, your site could be exposed. Warning signs include:
- Malware infections or hacking attempts.
- Missing SSL support or weak firewalls.
- No automatic updates or server-level backups.
A secure hosting environment is non-negotiable for protecting customer data and keeping your site compliant with modern web standards.
Business-Driven Reasons to Migrate
Sometimes, the decision isn’t technical but strategic, often forming part of a broader digital transformation strategy:
- Rebranding or new domain: A site move may align better with your updated brand identity.
- Scaling for growth: Upgrading to a more robust plan supports future traffic and revenue goals.
- Ownership changes: If a website changes hands, migration to a preferred host is usually part of the transfer.
Preparing for a Smooth WordPress Migration
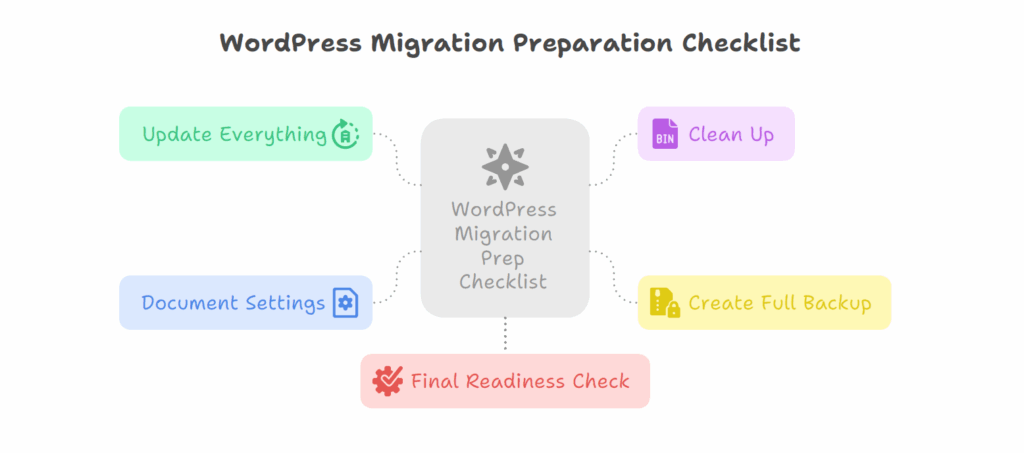
A successful WordPress migration starts long before you move a single file. The preparation stage is where most problems can be prevented. By taking time to update, clean, and document your site, you reduce the risk of errors and downtime once the transfer begins.
One of the first steps is creating a pre-migration checklist. This list serves as your roadmap, ensuring nothing gets overlooked during the move. Think of it as an audit of your website’s current health: which plugins are active, what server settings are in place, and whether your WordPress installation is up to date.
Keeping your WordPress core, themes, and plugins updated is critical. An outdated theme or plugin might still work on your old host but fail on the new one if the environment uses newer versions of PHP or MySQL. Updating everything beforehand reduces compatibility issues and ensures your website is fully supported in its new home.
Before backing up your website, it’s also smart to clean up unused plugins and files. Old themes, inactive plugins, or leftover media not only take up space but can also introduce vulnerabilities. Removing this digital clutter makes the backup lighter and the migration process faster.
The most important step is creating a complete backup of both files and the database. Files contain your site’s structure, media, and code, while the database holds your content, settings, and user information. Without both, you risk losing critical parts of your site. Store these backups in a secure, off-site location so you have a reliable fallback if anything goes wrong during migration.
Finally, don’t forget to document DNS and email settings. DNS records determine how traffic reaches your website, while email configurations ensure messages tied to your domain function correctly after the move. Recording these details in advance helps avoid confusion and speeds up the post-migration setup.
By carefully preparing each of these elements, you create a stable foundation for the migration process. Instead of reacting to problems as they arise, you’ll have everything organized and ready, making the transfer smoother and less stressful.
Choosing the Right Method to Transfer Your WordPress Site
Not every migration looks the same. The right approach depends on your technical skills, the size of your website, and the tools available from your hosting provider. Understanding the main methods will help you pick the one that balances speed, safety, and control.
Manual Migration is the traditional way to transfer a WordPress site. It involves downloading files via FTP, exporting your database, and reconfiguring everything on the new host. While it requires more technical knowledge, it gives you complete control over each step and avoids plugin limitations.
For those who want a simpler process, plugin-based migration is often the preferred choice. A migration plugin can automate backups, database transfers, and even URL replacements. This method saves time and reduces the chances of human error, though very large websites may hit plugin file-size limits.
Some hosting environments also offer cPanel or Plesk migration tools, which streamline the process with built-in backup and restore features. These are particularly useful if both your old and new hosts use the same control panel.
Finally, larger or more complex websites may benefit from a staging site migration. This involves setting up a duplicate of your site on the new host, testing it thoroughly, and then pointing your domain to the new server once everything works. It’s the safest option if you want to minimize downtime and catch potential issues before going live.
Each method has its advantages, and the best choice depends on your situation. Beginners often prefer plugin-based tools, while advanced users and developers may lean toward manual or staging migrations for precision. Businesses looking for scalable solutions might also consider Expert WordPress Developer to handle migrations for clients.
How to Transfer WordPress Site Manually (Technical Walkthrough)
Migrating manually gives you complete control over every step. While it may seem technical at first, following each stage carefully ensures a smooth transfer without relying on external tools.
Step 1 – Select a Reliable New Hosting Provider
Before moving files, choose a host that can handle your website’s present and future needs. Key considerations include:
- Speed and Performance – Ensure servers are optimized for WordPress.
- Security Features – Look for SSL, firewalls, and malware protection.
- Compatibility – Updated PHP and MySQL versions are essential.
- Support – 24/7 assistance is valuable during migration.
Pro tip: If you previously faced frequent downtime, prioritize uptime guarantees and scalability in your new host.
Step 2 – Back Up Website Files via FTP or File Manager
- Connect to your current host with FTP software (such as FileZilla) or File Manager.
- Locate your root directory (commonly
public_htmlorwww). - Download the entire directory to your local system.
This copy includes themes, plugins, uploads, and configuration files. Skipping this step can lead to permanent data loss if anything goes wrong later.
Step 3 – Export Your WordPress Database
- Log in to your hosting control panel, typically cPanel.
- Open phpMyAdmin and select your WordPress database.
- Click Export → Quick → Go to download a
.sqlfile.
This file is the core of your site, containing posts, settings, and user data.
Step 4 – Create a New Database on the New Host
On your new hosting account:
- Go to cPanel → MySQL Databases.
- Create a new database and assign a user with full privileges.
- Record the database name, username, and password.
You’ll need these credentials in the next step to reconnect WordPress.
Step 5 – Upload Files to New Server
- Connect to your new hosting server using FTP.
- Navigate to the root folder.
- Upload the files you downloaded earlier.
The transfer may take time depending on your site’s size. Be sure you upload the entire WordPress directory, not just theme files.
Step 6 – Update wp-config.php With New Credentials
Once your files are in place:
- Locate the
wp-config.phpfile in the root directory. - Open it in a text editor.
- Update the database details with your new credentials:
define('DB_NAME', 'new_db_name');define('DB_USER', 'new_username');define('DB_PASSWORD', 'new_password');Save the file. This connects WordPress files to your new database.
Step 7 – Point Your Domain to New Host (DNS Update)
Your site is ready on the new server, but visitors will still be directed to the old host until you update DNS records.
- Log in to your domain registrar account.
- Replace the old nameservers with those provided by your new hosting provider.
DNS changes can take 24–48 hours to propagate worldwide. During this period, some users may see the old site while others reach the new one.
Step 8 – Test Website Functionality
After propagation completes, thoroughly test your site on the new host:
- Browse through pages and blog posts to confirm proper loading.
- Test forms, user logins, and eCommerce checkout if applicable.
- Verify that images and styles appear correctly.
- Check site performance with speed testing tools.
If any issues arise, check file paths, re-import the database if needed, or run a search-and-replace to update outdated URLs.
By carefully completing these eight steps, you gain a smooth and reliable manual migration. This method requires patience but ensures maximum control and reduces reliance on plugins or automated tools.
How to Migrate Using a WordPress Plugin
If you’re not comfortable with manual migration or simply want a faster process, using a WordPress migration plugin is one of the easiest options. These tools automate backups, transfer files, and even handle database imports for you. While large or complex sites may occasionally run into plugin size limits, most small-to-medium websites can be moved with minimal effort using this method.
Step 1 – Choose and Install a Migration Plugin
From your WordPress dashboard:
- Go to Plugins → Add New.
- Search for a reliable migration plugin.
- Install and activate it on your existing site.
Most plugins provide guided wizards, making them beginner-friendly.
Step 2 – Create a Backup Package
- Open the plugin’s settings and generate a full backup of your website.
- This typically includes both site files and your database.
- The backup is usually exported as a single compressed file or package.
Note: Some plugins allow you to customize what’s included (e.g., exclude media files if not needed).
Step 3 – Set Up Your New Hosting Environment
- Sign up and prepare your new hosting account.
- Install a fresh copy of WordPress on the new host.
- Add the same plugin you used earlier.
This ensures both sites are ready to communicate.
Step 4 – Upload and Restore Backup
- From the plugin on your new WordPress install, choose the option to import or restore.
- Upload the backup package created from your old site.
- The plugin will automatically recreate your site — files, database, and configurations — on the new host.
This step is where most of the heavy lifting is automated.
Step 5 – Update Permalinks and Settings
Once the site is restored:
- Go to Settings → Permalinks and click Save Changes to refresh the link structure.
- Review plugin configurations, theme settings, and widgets to confirm everything transferred correctly.
- Perform a quick run-through of pages, forms, and images.
Step 6 – Point Your Domain and Test the Site
Just like in manual migration, you’ll need to update DNS settings with your domain registrar to point traffic to the new host. After propagation, test the live site thoroughly:
- Check links and images
- Test forms and checkout functionality
- Ensure SSL is active
- Monitor performance on the new server
When to Use Plugin Migration
This method is best if:
- You have a standard WordPress website (blog, portfolio, business site).
- You prefer simplicity over technical control.
- Your website size falls within plugin limits.
For high-traffic or large database sites, a staging or manual approach may still be safer.
This section shows readers that plugin migration is less intimidating but still requires careful follow-up testing.
Advanced Migration Methods for Complex Sites
While plugins and manual transfers work well for many WordPress websites, some situations call for more advanced methods. Large eCommerce sites, membership platforms, or websites with heavy traffic often need extra caution to avoid downtime or errors. In such cases, using staging environments, hosting panel tools, or FTP transfers can be more reliable.
Staging Site Migration
A staging site is essentially a clone of your website that runs on a separate environment. It allows you to test the migration before making changes live.
How it works:
- Create a staging site on your new host (many managed hosting providers include this feature).
- Copy your live site into the staging environment.
- Test every function — checkout, forms, user logins, and plugins — to confirm everything works.
- Once verified, push the staging site live and update DNS settings.
Why use it? Staging sites are ideal for minimizing downtime and catching errors before they affect your visitors.
cPanel or Plesk Migration
If both your old and new hosts use control panels like cPanel or Plesk, the migration becomes simpler.
- Use the built-in Backup Wizard or Full Account Backup option to generate a complete copy of your site.
- Upload this backup to your new host and restore it through the same interface.
- Create a new database and connect it via
wp-config.phpif needed.
This method is faster than manual migration because many settings are copied automatically. However, it only works if both hosting environments support the same control panel.
FTP Migration for Developers
FTP migration is another manual method that relies on direct server connections. It is often used when hosts do not provide cPanel/Plesk or when you prefer complete control.
Process overview:
- Connect to your old hosting server using an FTP client.
- Download all website files, including
wp-admin,wp-content, andwp-includes. - Export the database via phpMyAdmin.
- Upload the files to the new host through FTP.
- Import the database and update
wp-config.php.
This method is almost identical to standard manual migration but uses FTP exclusively for file management. Developers often prefer this for its flexibility, though it requires more time and technical confidence.
Which Advanced Method Should You Choose?
- Staging migration: Best for large, complex websites where downtime must be avoided.
- cPanel/Plesk migration: Perfect if both hosts use the same control panel and you want speed.
- FTP migration: Ideal for developers or technical users who want precision and control.
By choosing the right advanced method, you reduce the chances of errors and ensure your site performs well on the new host without losing functionality.
Common Issues During WordPress Migration (and Fixes)
Even with careful planning, WordPress migrations can sometimes lead to technical hiccups. The good news is that most problems are predictable and easy to resolve once you know what to look for. Below are the most common issues and their practical fixes.
Database Connection Errors
The issue: After migration, you may see the dreaded “Error establishing a database connection.” This usually happens when the new server cannot access your database.
How to fix:
- Double-check database credentials (
DB_NAME, DB_USER, DB_PASSWORD, andDB_HOST) inwp-config.php. - Ensure the user has the correct privileges in the new database.
- Verify the database was imported fully without errors.
Broken Links and Missing Images
The issue: Links or images point to the old domain or file paths, leaving your site with broken visuals or 404 errors.
How to fix:
- Run a search and replace in the database to update old URLs with the new domain.
- Check the media library to confirm files were uploaded correctly.
- Use a plugin like Better Search Replace (or manual SQL queries) to correct paths.
500 Internal Server Errors
The issue: After migration, your site displays a blank white screen or a 500 error. This is often related to server configuration.
How to fix:
- Regenerate the
.htaccessfile by going to Settings → Permalinks → Save Changes. - Increase PHP memory limits in
wp-config.php. - Temporarily deactivate all plugins to identify conflicts.
Plugin or Theme Conflicts
The issue: Some plugins or themes may behave differently on the new server due to version differences or compatibility issues.
How to fix:
- Ensure WordPress, themes, and plugins are updated to the latest versions before migration.
- Disable caching or security plugins during the migration process and re-enable them afterward.
- If a theme or plugin is no longer supported, consider replacing it with an updated alternative.
DNS Propagation Delays
The issue: After updating DNS records, your site may take 24–48 hours to appear correctly for all users. During this period, some visitors still land on the old host.
How to fix:
- Use a temporary hosts file edit on your local machine to preview the site on the new server immediately.
- Inform users about potential downtime during propagation.
- Monitor DNS updates using online tools like DNS Checker.
Addressing these issues quickly ensures your WordPress site remains accessible, functional, and secure after migration. With backups in place, even unexpected problems can be resolved without losing data.
SEO and Performance Considerations After Migration
Moving a WordPress site is not just about transferring files and databases. The real difference lies in how SEO and performance are managed after migration. A thoughtful plan, often executed with the help of a WordPress SEO Optimization experts, ensures your rankings remain stable while also improving site speed and reliability on the new host.
Preserving SEO with 301 Redirects
If your domain or URL structure changes during migration, permanent 301 redirects are essential. These ensure search engines and visitors are automatically directed from old URLs to the correct new ones. Without them, you risk losing rankings, backlinks, and traffic.
- Add redirects in the
.htaccessfile (for Apache servers) or server configuration (for Nginx). - Redirect every important page, not just the homepage, to maintain relevance.
Ensuring SSL Certificates Are Active
Search engines and users expect secure websites. If your old host provided SSL, you’ll need to reconfigure it on your new host.
- Install or reissue your SSL certificate once the DNS has propagated.
- Test using “https://” across all pages to confirm secure connections.
- Mixed-content errors (where some resources still load over HTTP) can be fixed with a search-and-replace to update old links.
Checking robots.txt and Sitemap Settings
Sometimes, migration resets or alters these files, unintentionally blocking search engines.
- Review
robots.txtto confirm search engines are allowed to crawl your site. - Regenerate your XML sitemap (using a plugin or SEO tool) and ensure it reflects the new domain or URL structure.
- Submit the sitemap to search engines for faster indexing.
Submitting Site Changes in Google Search Console
Google needs to be informed about your site migration, especially if it involves a domain change.
- Log in to Google Search Console.
- Use the Change of Address tool (for new domains).
- Submit your updated sitemap.
- Monitor crawl errors, indexing issues, and performance reports in the following weeks.
This proactive step reassures search engines and helps maintain rankings.
Improving Speed with Optimized Hosting
One of the biggest advantages of moving to a better host is performance. Once the migration is complete:
- Run speed tests using tools like PageSpeed Insights or GTmetrix.
- Enable server-side caching or use a caching plugin.
- Consider a Content Delivery Network (CDN) for global visitors.
- Optimize images and scripts to reduce load times further.
A faster website improves user experience and can boost your SEO rankings over time.
By paying attention to these SEO and performance details, you ensure that migration strengthens your website instead of disrupting it. Proper redirects, indexing settings, and speed optimization can make the transition seamless for both users and search engines.
Post-Migration Checklist: Testing and Verification
Completing the transfer is only half the process. Once your WordPress site is live on the new host, thorough testing ensures that everything works exactly as expected. Skipping this step can leave users facing broken features or missing content, which hurts both trust and SEO.
Test All Pages, Posts, and Media
Go through your site page by page. Confirm that:
- Blog posts display correctly, including formatting and comments.
- Images, videos, and downloadable files load without errors.
- Internal links point to the right locations, avoiding 404 pages.
A quick way to spot issues is to use a crawler tool that scans for broken links and missing resources.
Verify Forms, Logins, and eCommerce Functionality
If your site uses interactive features, test them carefully:
- Contact forms should send messages to the right email inbox.
- User login and registration must function smoothly.
- For eCommerce sites, test the checkout process from cart to payment confirmation.
Even one malfunctioning form or broken checkout page can cost you leads or revenue.
Check Mobile Responsiveness and Site Speed
Open the site on multiple devices — smartphones, tablets, and desktops. Ensure the design remains responsive and no elements break.
Run a performance test using tools like GTmetrix or Google PageSpeed Insights. Compare the results with your old host to confirm improvements or spot bottlenecks that still need optimization.
Monitor Uptime and Server Performance
After migration, it’s smart to track your site’s uptime for at least a week. Use an uptime monitoring tool to confirm the new host delivers on reliability.
Also review:
- Error logs for unexpected issues.
- Server resource usage (CPU, memory) if you’re on a VPS or dedicated plan.
Early monitoring helps catch hidden problems before they affect visitors.
Thorough testing not only guarantees a seamless user experience but also provides confidence that your migration was successful. With the site stable and performing well, you’re ready to focus on content and growth rather than technical troubleshooting.
FAQs on Transferring a WordPress Site
How long does migration take?
The time depends on your site’s size and method. Small websites may take 1–2 hours with a plugin, while larger or more complex sites can take several hours. DNS propagation may add another 24–48 hours before the new host is visible to all visitors.
Will my SEO rankings drop after migration?
If you keep the same domain and URL structure, SEO impact is minimal. However, if you’re changing domains, set up proper 301 redirects and update your sitemap in Google Search Console to protect rankings. In some cases, moving to a faster host can even improve search performance.
Can I migrate my WordPress emails too?
Yes, but email accounts are usually tied to your hosting provider, not WordPress itself. You’ll need to back up your email data and reconfigure accounts on your new host or a dedicated email service like Google Workspace or Microsoft 365.
How do I minimize downtime?
The best way is to migrate during low-traffic hours, use a staging site for testing, and only update DNS when the new site is fully functional. Some downtime may still occur during DNS propagation, but careful planning reduces disruptions.
What’s the safest migration method for beginners?
For small-to-medium sites, plugin-based migration is often the safest and easiest. It automates backups, database transfers, and URL replacements. If your site is large or mission-critical, consider a staging migration for added safety.
Final Thoughts
Migrating a WordPress site to a new host may feel overwhelming at first, but with the right preparation and process, it is entirely manageable. By keeping backups, documenting your settings, and testing thoroughly, you reduce the risk of downtime or data loss.
A successful migration is not just about moving files, it’s about ensuring your website remains secure, fast, and optimized on its new host. Choosing a reliable hosting provider sets the foundation for long-term growth, allowing you to focus on content, business goals, and user experience rather than server issues. For long-term stability, many site owners also combine migration efforts with ongoing WordPress Security Services to keep their websites protected after the move.
If you’d like guidance tailored to your site, our WordPress specialists are available to help ensure your migration is smooth and secure.
